# Introduction
# What is ezFlap?
ezFlap is a reactive markup library for Flutter.
With ezFlap, you can:
- Use XML to define your user interface.
- Style widgets with CSS-like selectors.
- Control the rendering flow with XML attributes.
- Forget about
setState().- The UI updates automatically when the underlying data is modified.
- Easily communicate with parent widgets, using:
- Events.
- Bi-directional models.
- Easy access to hosted widgets from their parent widgets' code.
- Separate business logic from widget tree building.
- Easier conversion of Vuejs and Angular web applications to Flutter.
ezFlap is inspired by Vuejs (opens new window) and a little bit by Angular (opens new window).
# What ezFlap Looks Like
This is what an ezFlap version of the Flutter bootstrap project may look like:
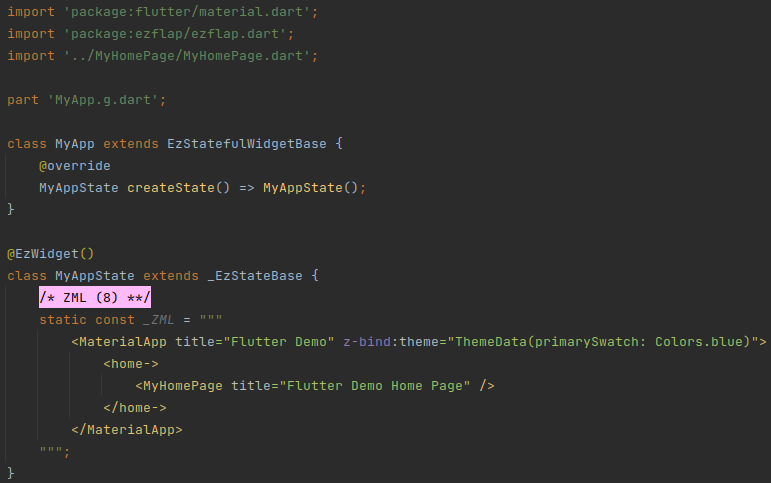
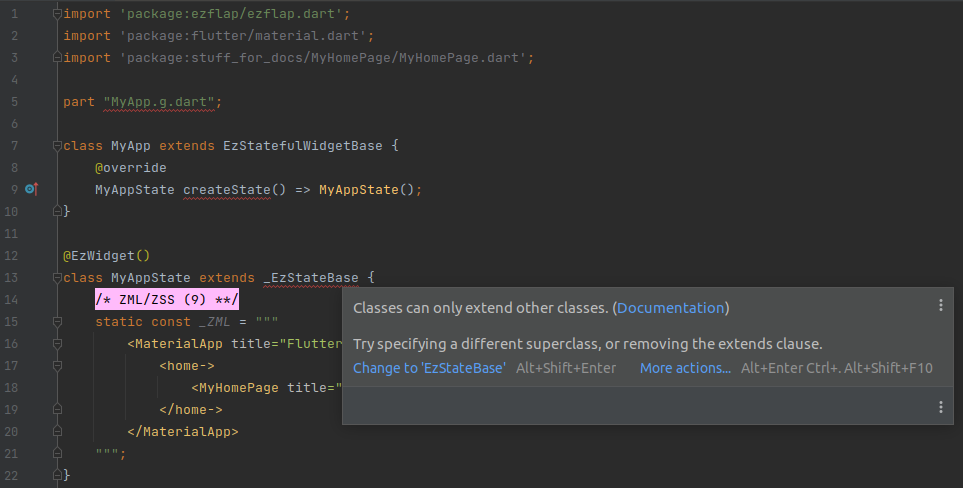
# MyApp
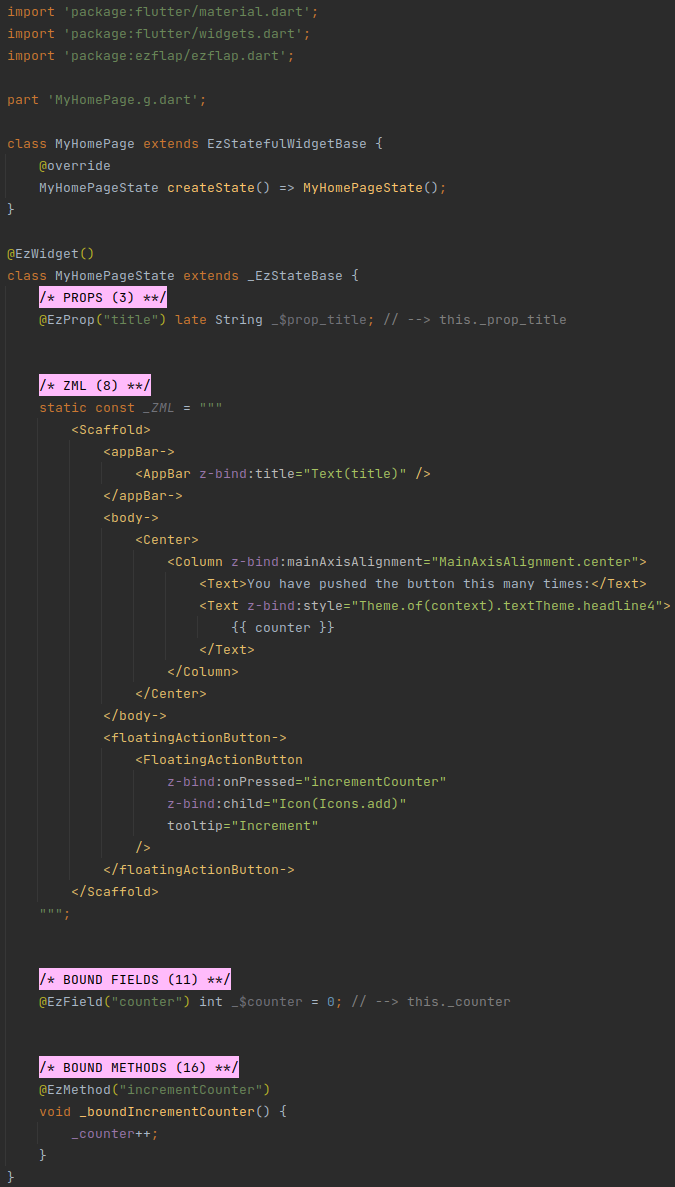
# MyHomePage
XML? ZML!
The XML in the above code expresses the structure and behavior of the UI.
It follows a simple set of rules that define how XML tags and attributes are converted to Flutter widgets and parameters.
It is called ZML.
# This Documentation
It is highly recommended to clone the ezFlap Docs repository:
git clone https://github.com/ozlao/ezflap_docs.git
cd ezflap_docs
flutter pub get
flutter pub run build_runner watch --delete-conflicting-outputs
2
3
4
The examples in this documentation are provided as images of code.
The reason is that it allows to have both Dart and XML syntax coloring at the same time.
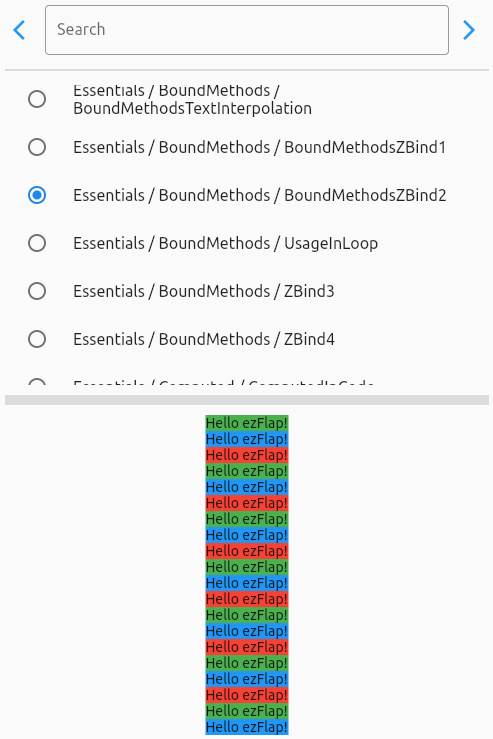
However, almost all examples are available in the ezFlap Docs project, under /Examples.
Further, the ezFlap Docs project comes with an Examples Player application that allows to easily find and execute examples.
It looks like this:
# Getting Started
ezFlap is mainly a build-time tool, used to "compile" ezFlap widgets to Dart.
An "ezFlap widget" is a Flutter widget that provides its render tree using ezFlap's ZML and annotations.
When developing ezFlap widgets - we do not write a build() method. ezFlap generates it for us automatically.
We will refer to Flutter widgets that are not ezFlap widgets as "native widgets".
ezFlap analyzes:
- The ezFlap widget class.
- ezFlap annotations.
- ZML code (that provides the build tree).
- ZSS code (that provides styling).
- ZSS files in the directory hierarchy.
Then, it generates the Dart code that will:
- Build the widgets tree
- Perform additional logic expressed in the ZML and ZSS of the widget.
WHAT IS ZSS?
ZSS is also XML-based.
It is used to define selectors (similar to CSS selectors), and the ZML that should be applied for widgets that match these selectors.
It is optional, and will not be used in the first several chapters of this guide.
It will be covered thoroughly in ZSS.
The generated code is written into a file named <classs file name>.g.dart (for example: MyApp.g.dart in MyApp
above).
DISABLE HOT-RELOAD-ON-SAVE
ezFlap works well with the Flutter hot-reload feature.
However, code generation is not immediate, and if your IDE performs a hot-reload automatically on save - then it will not reload the latest code.
It's best to disable hot-reload-on-save (and consider assigning a keyboard shortcut to it, instead).
# ezFlap Widget Classes
ezFlap widgets are stateful widgets.
We create a "MyApp" ezFlap widget like this:
- Create a MyApp class that extends _EzStatefulWidgetBase.
- (instead of extending Flutter's StatefulWidget).
- Add the createState method:
MyAppState createState() => MyAppState();
- Create a MyAppState class that extends _EzStateBase.
- (instead of extending State<MyApp>).
- Define the ZML in MyAppState.
IMPORTANT
The return type of the createState() method must be the widget's state class.
# Valid
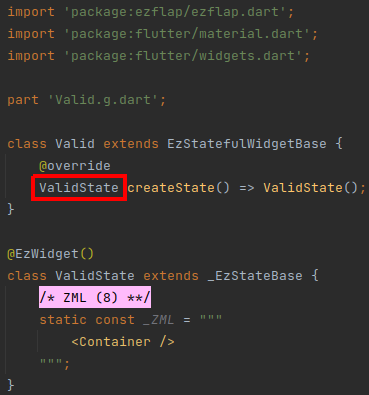
In the above example, the return type of Valid.createState() is ValidState.
This is because ValidState is the state class that corresponds to the Valid class.
# Invalid
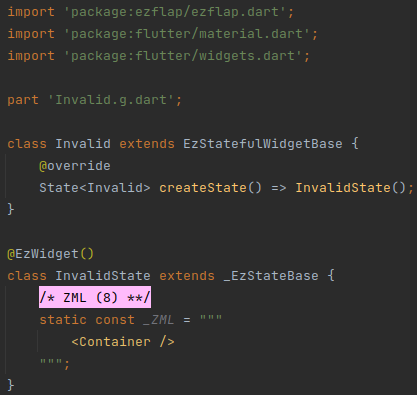
The code in the above example is invalid, because , the return type of Invalid.createState() should be InvalidState,
and it's not.
Instead, it is State<Invalid>, which is a valid return type from the perspective of the Dart compiler, but is not
valid in ezFlap.
# ZML
ZML is the heart of the ezFlap widget.
ZML is an XML-based language that directly maps to how a native widget's build() is written.
ZML has two types of tags:
# Class Tags
- The name of Class Tags is written in CamelCase. For example:
<Column>. - Class Tags correspond to classes.
- For example, the tag
<Column>corresponds to theColumnnative widget class. - As another example, the tag
<Border>corresponds to theBorderclass.
- For example, the tag
- Class Tags can have attributes and can contain child Named Parameter Tags (will be introduced in a minute).
- Attributes of Class Tags represent the parameters of their classes' constructors.
- For example, in the tag
<MaterialApp title="Flutter Demo">, thetitleattribute corresponds to thetitlenamed parameter of the default constructor ofMaterialApp.
- For example, in the tag
WARNING
ZML uses Class Tags to reference widgets and other classes.
The referenced widgets and classes must be imported into the file.
For example, to use Material widgets, the ezFlap widget's file must import material.dart (i.e. with
import 'package:flutter/material.dart';).
# Named Parameter Tags
- Named Parameter Tags correspond to a named parameter of the constructor of the widget of their parent Class Tag.
- For example, the
<appBar->Named Parameter Tag inside the<Scaffold>Class Tag corresponds to theappBarnamed parameter of the default constructor ofScaffold.
- For example, the
- The name of Named Parameter Tags is written as:
<camelCase->. For example:<appBar->. - Named Parameter Tags are always direct children of Class Tags.
- Named Parameter Tags have no attributes.
NOT JUST FOR WIDGETS
Named Parameter Tags usually appear inside Class Tags that represent widgets.
However, they can also appear for Class Tags that represent "regular" classes.
For example, BoxDecoration is not a widget, and we can use a Named Parameter Tag to provide a value to its color
parameter:
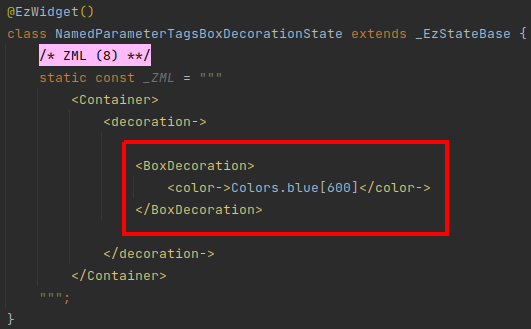
In the above example, the BoxDecoration Class Tag corresponds to the BoxDecoration class.
The constructor of the BoxDecoration class has a color parameter, and the above code passes the Dart expression
Colors.blue[600] to that parameter.
The generated build() code for the above example looks like this:

# Unnamed Parameter Tags
- Some Class Tags can contain child Class Tags directly.
- Such child Class Tags are called: Unnamed Parameter Tags.
- ezFlap automatically passes Unnamed Parameter Tags to the
childorchildrennamed parameter of their parent Class Tag's constructor.
For example, when parsing this ZML:

ezFlap will automatically pass the two Text widgets to the children parameter of the parent Column.
It will generate something like this:

# More About ZML
- ZML supports a lot more:
- Conditions.
- Loops.
- Handling events.
- Gaining access to hosted widgets.
- Text interpolation.
- And more!
Learn all about it in ZML.
# Annotations
Annotations are used to tell ezFlap about the special purpose of certain elements in the code.
For example, we place the @EzWidget annotation right above a widget class to tell ezFlap that it is an ezFlap widget:

@EzWidget comes before a class declaration.
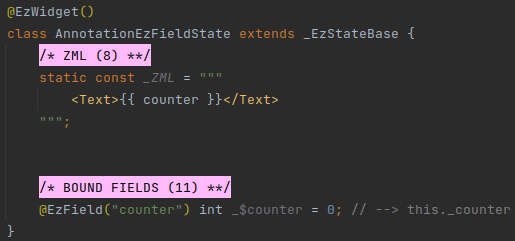
Some ezFlap annotations come before fields. For example, we can place the @EzField annotation before a field, and
ezFlap will make it accessible from inside the ZML (e.g. to use in text interpolation):
We can use the @EzMethod annotation to make methods accessible in the ZML:
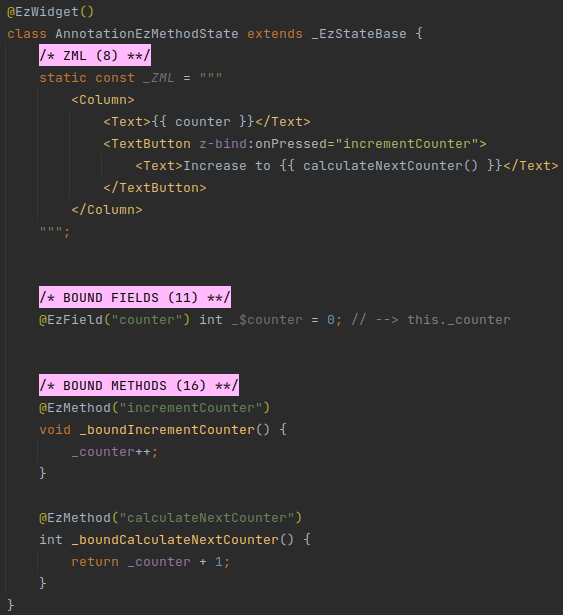
In the above example, two methods are marked as @EzMethod.
Both methods are used from inside the ZML.
incrementCounteris passed to theonPressedparameter of the TextButton widget.calculateNextCounteris invoked from inside text interpolation, and the value it returns is appended to the text: "Increase to ".
Text interpolation and the z-bind attribute prefix syntax is covered in detail later in this guide.
# Naming
Notice how the ZML references the fields and methods.
Instead of using the "actual" method names - it uses a simplified form, that is provided as parameter to the @EzMethod
annotation.
This simplified form is called Assigned Name.
For example, the _boundCalculateNextCounter method is not invoked by writing: Increase to {{ _boundCalculateNextCounter() }}.
Instead, we use the Assigned Name that was passed to the @EzMethod annotation: "calculateNextCounter".
$$$
Notice the name of the `@EzField` field: `_$counter`.
This dollar sign in the name means that this field should not be accessed by our code.
CONVENTION
Do not access fields, invoke methods, read constants, or do anything else with things that have $ in their name.
For example: do not store data in or read data from the _$counter field.
When developing with ezFlap, we come across classes, methods, properties, and fields that have a dollar sign in them.
This dollar sign means that they are internal to ezFlap and should not be used by our own code.
Notice the comment after the field declaration: // --> this._counter.
This comment reminds us to access this._counter (or just _counter) instead of _$counter.
This is an important, repeating implementation detail of ezFlap.
ezFlap creates a getter/setter pair instead of the field marked with @EzField, in the generated _EzStateBase
class, which the ezFlap widget class extends.
Therefore, if we need to access the field from our code, we access it as _counter instead of _$counter.
And when we need to access it from ZML - we use the Assigned Name: counter.
CONVENTION
ezFlap offers several annotations for fields.
@EzField is one example, but there are others.
Some of these annotations generate a property that needs to be used by our code instead of the field, just like
@EzField does.
When using such annotations, the convention is to add a comment at the end of the line, like // --> this._counter.
This comment reminds us the actual name to use if we need to access the field from the code.
Import the ezFlap Live Templates for Android Studio/IntelliJ IDEA.
They will take care of the annotations syntax, and also add such comments automatically, for annotations that need it.
# Build
When we are ready to test out our creation, we need to invoke ezFlap to compile the ZML and annotations to Dart code.
We do this with Dart's Build Runner (opens new window) tool.
We run the following command in our project's root:
flutter pub run build_runner watch --delete-conflicting-outputs
This command invokes build_runner and generates the .g.dart files (like our MyApp.g.dart).
Its output may look kind of like this:
[INFO] Generating build script completed, took 358ms
[INFO] Setting up file watchers completed, took 14ms
[INFO] Waiting for all file watchers to be ready completed, took 302ms
[INFO] Reading cached asset graph completed, took 56ms
[INFO] Checking for updates since last build completed, took 856ms
[INFO] Running build completed, took 19ms
[INFO] Caching finalized dependency graph completed, took 48ms
[INFO] Succeeded after 79ms with 0 outputs (0 actions)
2
3
4
5
6
7
8
It may look different the first time it runs, or after running flutter pub get or flutter clean.
The first run may also take a while (10-20 seconds, or even more than a minute for larger or complex projects).
However, this command puts build_runner in watch mode, and subsequent changes to ezFlap widgets (e.g. change to the ZML) will be compiled quickly as soon as the file is saved (usually in under a second).
DO NOT BE ALARMED
After creating a new ezFlap widget, before running build_runner - there will be errors:
This is normal. These errors are because _EzStateBase has not been generated yet.
They will go away after running build_runner.
# Declarative Rendering
ezFlap has several predefined attributes to control rendering.
We will look at a couple here.
# z-if
The value of the z-if attribute is a Dart expression that evaluates to a boolean.
# Example
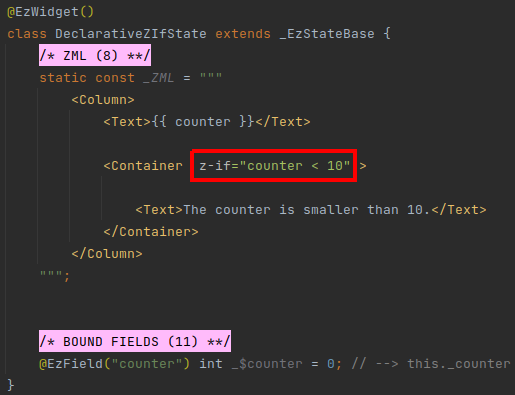
The widget in which we put the z-if will be rendered only if the Dart expression in the z-if evaluates to true.
The z-if expression can reference:
@EzFieldfields by their Assigned Name.@EzMethodmethods, also by their Assigned Name.- Other elements that will be introduced soon, in the ZML chapter.
z-if is covered in more detail later in this guide.
# z-for
The value of the z-for attribute has a special syntax, similar to v-for and ngFor in Vuejs and Angular.
# Example
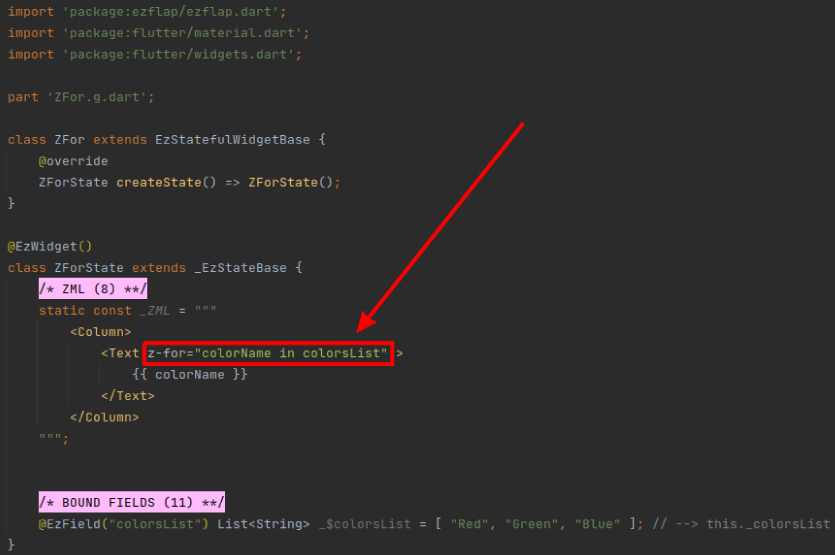
The above code renders:

z-for is covered in more detail later in this guide.
# Pink Sections
By convention, an ezFlap widget is divided into sections.
Each section contains a well-defined part of the widget class.
To visually differentiate between the sections, we start each section with its own Pink Section label:
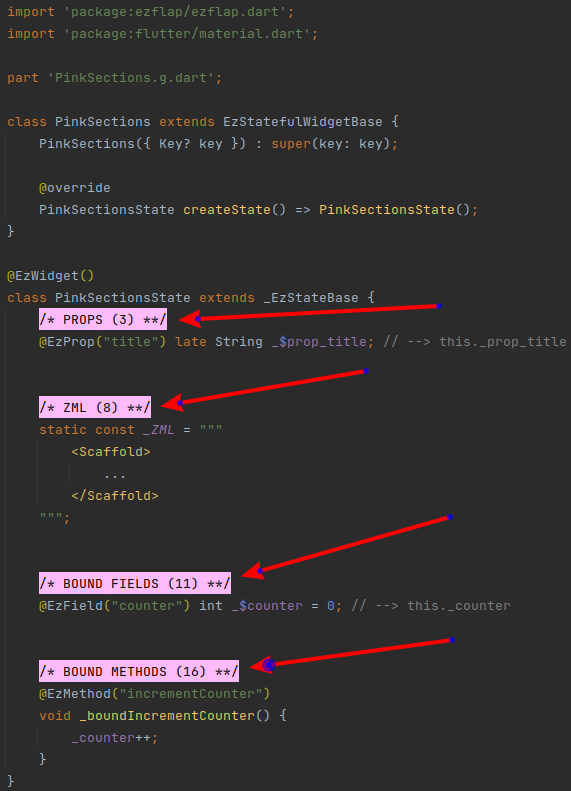
The number in the parentheses tells us the order of the sections. Not every widget uses all types of pink sections, so usually there will be gaps between the numbers.
The pink section labels are just regular Dart comments and have no effect on ezFlap or on the application itself.
This convention is followed throughout this documentation, but it's optional.
CONVENTION
Divide ezFlap widgets into Pink Sections.
Use Live Templates to add them easily. No need to memorize them!
Head over to Pink Sections to read about all the types of pink sections, and to find instructions (and RGB!) to configure the Pink in Android Studio/IntelliJ IDEA.
# What's Next
This documentation is meant to be read in the order of the chapters.
It is best to read it in order, because later parts depend on earlier parts.
If you haven't installed the ezFlap package or the documentation examples project yet - now would be a good time to do that. Just follow the instructions in Installation.
To get fully set up, be sure to furnish your IDE with Pink Sections and Live Templates.
Once you are all set up - proceed to the ZML chapter.
← Installation ZML →